Wednesday, November 16, 2016

Life Crisis

It has been so long since I have posted something.  Life has a way of taking all your worst fears, balling them up together and then throwing them straight at your chest.  I was engaged to what was suppose to be my second husband.  Thankfully, the wedding never happened and I learned a horrible truth about the type of person he is.  It's crazy really that my gut was giving signals about him and I just plan ignored them because here he was, taking care of four kids someone else fathered and being there for them like a father should have been.  In reality, he was just as bad, if not worse, then their biological fathers who eventually stepped out on them.  While the decline of our relationship took a toll on me, I gave up a lot of things I love, this blog being one of them.  When I met this guy, I was about year out from a terrible and violent relationship.  I fell right into his narcissistic trap and wasted almost 6 years of my life.  I am carrying a lot guilt about everything that has come to light and I just hope that despite the craziness, my kids are going to come out of this okay, better people, more aware of society and caring for the people they love.

As I work to find myself once again, I return here, my fun and safe place to be who I really am.  I hope that despite my absence, my readers and followers will welcome me back.  I will be updating and re-vamping and planning once again to share with all of you.  

I want to also note, that just because he/she doesn't hit you, doesn't mean it is domestic violence.  It doesn't have to be physical to be abuse.  Talk to someone, reach out, create and KEEP a circle of people who you can trust to help you be safe.  I have just hung my hat up on an abusive relationship that was not physical and I stayed and lived with it because I had already been through the violent craziness of another type of abusive relationship and I didn't let my heart see this was just as bad.  

I will be making a tab for Domestic Violence resources and will at first concentrate on my local area.  If you live in a different area outside the Kansas City, Mo metro area, please comment with your space and I will help you find the resources to leave, be safe, or learn about what you are dealing with.

I love you all!  The fun and amazing things are coming back.  I will be here and I pledge to never leave you again!

~Happy Life, It's important
Brandie 

Wednesday, January 13, 2016

Edible Bird Nests! (3 Cheers GS Daisy Journey)

During the 3 Cheers Journey for the Daisy Girl Scout Journey, the sessions make snack suggestions for meetings.  One of the options was an edible nest made out of veggies.  On the particular day that my daughter and I did this session, we were doubling up on sessions.  Therefore, to my daughter's delight, she got two snacks!  The other snack was veggie related so I wanted to switch it up and give her a sweet treat.

I remember from my childhood, making edible nests out of Chinese noodles and chocolate!  I searched Pinterest for a recipe that matched what I remember and lucked out big time!

My daughter was so excited to make these and since the session we were working on included nests, we were able to further the conversation about nests and animals that use them.


Here you can find the recipe!
We omitted the nuts, simply because my daughter didn't want them.  They do make cute little eggs tho!


Here is what our mixture looked like:


We plopped them on wax paper and put them in the fridge:

and here is our finished product!


There were soooo good!

~Happy Scouting!
Brandie


Friday, January 8, 2016

Daisy Girl Scouts 3 Cheers Journey Activities!

In our adventure into Girl Scouts independently without a troop, my daughter and I have found many fun ways to make up for the lack of a troop.

I love that the GS store allows me to purchase the troop leader information so that I can help Danielle successfully move through earning her badges.  Our current adventure is the 3 Cheers Journey for the Daisy level scouts.

The leader book has session lined out to help lead troops through the program.  A lot of these activities are developed for a group of girls.  When you are working with just one girl and at a faster pace, you've gotta do things a little different.

Below is a list of activities that are suggested in the adult book for the journey that my daughter and I changed to meet the needs of our situation.

Team Bird Bath
 The team bird bath is used hold drawings and sentences that capture their ideas on how to care for animals.  During the second session, the girls are prompted to create an All About Me Nest.  The All About Me Nest is used to hold all the things the girls learn.  Each girl will have her own All About Me Nest and the troop shares the Bird Bath.

All About Me Nest
Since the "troop" and the girl is the same for us, we changed up their uses just a little bit.  The All About Me Nest is used at each lesson and my daughter will write or draw something that we talked about that she already knew (for example, we did a field trip to our local zoo and we talked about habitats, she wrote about the penguin habitat in her nest.  She already knew where they lived thanks to movies like Happy Feet ;) ).  The Bird Bath we use to put information that she learns as we go.  If she discovers a new fact about the animals we are talking about or learning about, she writes it down and puts it in her bird bath.

Red Robin Project
The Red Robin Project is designed for the girls of a troop to show off what they have learned.  The idea is to complete a project that shows off their new found knowledge to their parents.  Since both her father and I are involved with her program, we were already aware of what she was learning.  From the beginning of her joining Scouts, I made her a journal so she could write down what she learns throughout the scouting program.  For the Red Robin Project, we had her write a short story about how to take care of animals and read it aloud for us.  This allowed her to meet the requirements of earning the Red Robin portion of the journey.

Tula Award
This is the final step to the 3 Cheers journey.  This project is designed to have the girls perform a game where they act out an animal they learned about and the audience has to guess what animal.  They go on to discuss how they care for animals.  For this project, we had Danielle tell us about the animals on her mural (see the adult handbook).  

Each week, the girls are prompted to create a specific animal for the mural and then they do a craft or read a story about the animal.  For the Tula Award, we had the girl point out the animals on the mural and tell us one thing she learned about the animal.  We finished with her writing in her journal again about her favorite way to care for animals.

This journey was a lot of fun to work through.  The girl's book companion has a list of recipes for snack ideas for the meetings during the sessions.  There are some pretty fun snack ideas and a couple of them have been added to our weekly after school snacks! 

~Happy Scouting!
Brandie

Wednesday, January 6, 2016

Minecraft Creeper Valentine's!

Valentine's with Boys can be difficult!  Luckily my boys have pretty fun interests and we were able to tie these into our Valentine's!

Creeper Valentine's were so fun to make!

Here is what you need to make your own!
Hersey's Snack Size bar (or other candy about the same size)
Creeper Wrappers
Blast Tags
Twine or String
Scissors (to cut out the wrappers and tags)
Tape for the wrappers
Hole Punch

Down load the wrappers and the tags below!
Creeper Wrappers
Blast Tags


Cut out the Creeper wrappers and tape them around your candy.  Cut out the tags,
punch a hole in the middle of the black section of the tag, tie a piece string around the candy with the tag attached.

If you have a Minecraft Fan, these Valentine's will be a perfect match!

~Happy Valentine's Crafting!
Brandie

Tuesday, January 5, 2016

Minecraft Birthday Party

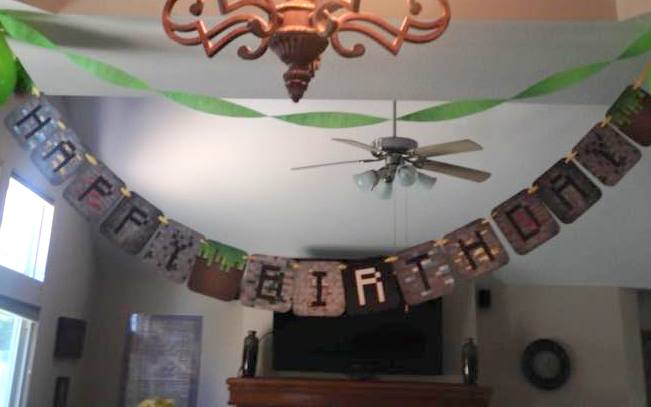
I have huge Minecraft Fans in my house!  This past summer, my youngest son wanted a minecraft birthday.  I had a blast putting his party today!
Here you will find all the projects I did to get prepared for the party as well as links to the printables I created to accompany the party.

I scoured Pinterest for ideas (where else would I look!).  I found some really cool Perler Bead Patterns that are Minecraft themed!  Check out my board here!!  These were so fun because the Perler Beads make the design you are doing look pixel-ated which is what Minecraft is all about!

Here are my creations based off the patterns I found!  You are welcome to go dig through my Pinterest Board!


The kids and I had so much fun making these that we went on to make Princesses, Harry Potter Designs and more!  Look for more posts on those!

I created a "Happy Birthday" sign, which you can download in PDF form here!!


I also made invitations to match!  That PDF File can be found here!

I'm always big on having food available so I made food cards as well!  Check out a few of them below and download the PDF file here!


I bought a square cupcake pan (or individual brownie pan) to make the "cake" for this party!  I loved finding the square pan because it allows me to do all kings of fun stuff that is pixel shaped!

The goal was to make a Diamond Sword out of cupcakes....I feel like this was good!


For decoration around the banner, we blew up some Creeper Green balloons and drew Creeper faces on them!  I was really surprised how well they turned out free hand drawn on!  Squares are easy :D

The kids had a blast checking out all Perler Bead items we made and they each got to take home a necklace made out of a Perler Bead Design (they could choose a Steve Head, Ender Head, or Creeper Head....we then ran a string through one corner of the design!).


I hope you find some useful ideas here!
~Happy Party Planning!  Mine ON!

Brandie

Sunday, January 3, 2016

New Year Resolutions!

This time of year is always full of new plans and promises to be a better version of our selfs, reach some goals and accomplish our dreams!  2015 was an interesting year for me and looking back, I didn't concretely accomplish too much. I did however, get myself on track to work on some really amazing things this year!

Top of that list:
Get Back To My Blog! 

I do not work outside the home. While this is not a choice I made, simply circumstances that is life, I need to be WAY more productive with my days!  I have a TON of info that needs to be here...and it's not.  That's changing!!

Next on my list:
Get Serious About My Businesses

I have two!  A bling/shirt/craft business I run through Etsy and a direct sales business with Younique!  I love both dearly but have not committed the appropriate time to either one of them! 

Lastly:
Get Back In Control of My Health

I've slipped quite a bit on staying on top of my medical staff to figure out what is wrong with me and that is just not okay!  I had surgery in 2014 and it's had me gun shy about discovering the other ailments that make my day to day a struggle.  I intend to overcome that fear and get my body back!!

There are of course some financial goals I have for myself, but those are no different then anyone else.  Get further out of debt, work on my credit score and improve my living status.  If I do the above, the rest will follow!!

I hope everyone who reads this had a wonderful New Year's Eve and holiday last month! 


Next Up On the Blog:  Family Binder and Command Center!

~Love You All

Brandie :) 

Thursday, November 12, 2015

Independent Girl Scouting!

Due to schedule conflicts with the sports my daughter chooses to participate in, Girl Scouting with our local troop was impossible a year ago.  After listening to her crys to be a Girl Scout like her momma, I did as much research as needed to learn that we could march through the Girl Scout program independent of a troop!  In March 2015, we bought the books and uniform and got to work!

As of today she has earned all but one of her petals and has started her first journey for Girl Scout Daisys!  I have decided to document the work she does with her journeys and hopefully, another mom and daughter couple who have conflicting schedules can see that being a Girl Scout independently is completely possible!

I have found a great network of troop leaders, service unit members and fellow GS moms to work with as my daughter moves through the projects and stories.

Here is my Pinterest board for resources such as award letters, lesson plans, craft ideas, etc.

Tonight, my daughter and I start the first Journey of her 2nd Year of Daisy Girl Scouts.  She chose to start with "It's Your Story-Tell It! 5 Flowers, 4 Stories, 3 Cheers for Animals!"  We have coupled with a 2nd year Daisy Troop and are going on a field trip to our local zoo this weekend.  If you choose to do Girl Scouts Independently with your daughter, I highly suggest purchasing the leader companion book for the journeys!  They line out EVERYTHING in sample lesson plans.  This makes planning projects, crafts, etc sooooo much easier!

I will try to post once a week on Girl Scouting with the projects we do so that you can have these ideas and steps for reference!  A lot of the projects we are going to do are not just for Girl Scouts and you are welcome to apply these to whatever adventure you and your child are on :D

~Happy Scouting!
Brandie

Wednesday, February 18, 2015

I turned 30!

Yesterday I turned 30.  Leading up to that, I was in serious winter depression.  Nothing dangerous....but I was NOT in the mood to craft, blog, write, etc.

I am over it!  My oldest son is getting ready to running track, baseball/softball season is getting ready to start, I am getting my Girl Scout Cookies today, I am GOOD!

With that, I want to share a little of what I have gotten accomplished since I posted last November.

I made Valentines for kids' classrooms.  It's a little late to share those, but I will blog about them early next year!

I have been trying to grow my bling apparel business.  If you are interested in the things that I do with that, check out my Facebook Page!!  I currently have my bling featured in the local screen printing shop and that is super exciting!  If you happen to own a boutique or apparel store and would to have bling apparel featured in your store as well, shoot me an email @ {mrs.brandielyons@gmail.com}!!

I stopped selling almost ALL of my direct sales businesses.  Pikle, which is still my favorite, raised their prices to a point that I could no longer make the sale.  Hopefully, one day that will change and I can pick that back up!  Currently, I still provide Younique Products to my local friends and family.  If you are interested in learning more, click the link or send me an email!

I am very excited about St. Patrick's Day this year!  The kids actually have school on this day and I have so many ideas!!!  They will be my first craft posts after this one :D

I re-vamped my craft space and am still un-packing things.  I will be sharing what I find useful on Pinterest and do!

This 31st year of mine is going to be so much more fun then last year!

I appreciate my readers and those that still come to my page to get inspired!  Things are going to get better and if you EVER have ideas or want me to do something, PLEASE send me an email!!

Thanks so much,
Love the newly 30 something~ Brandie

Tuesday, November 18, 2014

A Dollar Tree Christmas Village!

I have always wanted one of those light up tiny villages with the little houses and shops and the little people.  I find the cost to build such a town to be very much out of my reach!  Last weekend, we were shopping the clearance racks for next year's Halloween (decorating a home is expensive lol) and wondered into a Dollar Tree.  They, like the rest of the world, had their Christmas merchandise out on Nov 1st.

On a little end cap on our way out I found the small pieces to a Christmas Village.   With everything just a $1....how could I pass this up?!?

I spent all of $20 and got all of this.....


Cute isn't it?!?  None of the pieces light up BUT I can afford to get one or two to complete the look and be VERY happy :D

Next on my list....a Faux Fireplace....this is going to be FUN!

Faux Fireplace!

Our move over the summer left us in a home without a fireplace!  While we love our new home, Santa needed a way to get in and the kids needed a place to hang their stockings!

I search the Pinterest looking for "No Fireplace Stocking Ideas" and I came across some super cute ideas!

Here is what I came up with :)


Here is how I did it!

Supplies:
Board Game Boxes from the Post Office (can be ordered FOR FREE!)
White Craft Paper
Red Scrap Book Paper (cut into 3x4 inch rectangles)
Tape
Glue
Cutting Tool

I decided on how I wanted the fireplace to look.  I taped the pieces together with boxing tape. 

I then taped the craft paper around the whole thing.

Lastly, I glued the red "brick" pieces in a brick like pattern.

Once done, it was ready to decorate!

The kids love it and now want me to fashion a faux fire....man, I love Pinterest ;)

Wednesday, November 5, 2014

A New House! New Rules! And someone got his own room!!

Three months ago, my family packed up and moved to a new town.  Not too far away (next door actually).  We need a new scene.  My boys were getting bullied and the oldest was struggling academically.

We tested the waters out but joining this new town's baseball league.  We thought it would be a great way to get to know some of the people we would spend a lot of our time with if we moved and it would allow the boys to look at a game they love with new eyes.

The football and baseball season that preceded this spring were horrible!  From grown men bullying their players (and no....not it the way some think is okay....straight up in my son's face calling him a cry baby and another telling my son he is failure at life and will amount to nothing....mind you...because one kid couldn't take 20 tackles in a row from a kid THREE TIMES his size and the other for getting struck out for the second time in  single game), to violently touching my sons, to well....it was just ugly.  It's several different coaching staffs and we were DONE!  For a while, my boys were going to quit sports altogether....afterall the town we lived in made it very clear that they were not good enough...so why bother??

The prospect of getting to show what they know about the games they love to strangers was very exciting for them.  They flourished in ways I never thought possible.  In this one season of baseball, we found a handful of partners in helping my boys cope their PTSD, handling parenting struggles we were having at home, and a new family of friends.  As the baseball season came to a close, the decision was made.  This place was home!

It was a hard fight to find a home....from our current property management place (with which we lived THREE years) telling lies about us to our prospective new landlord to coughing up an extra months rent to secure the lease....we fought!  I was so pleased with the result.

We live in an actually home! not some townhouse that is barely big enough to house this family.  We have a three bed room, single dwelling, with a finished basement and a fenced in yard.  Oh my...the deck!  I mean seriously!! For just a few bucks more a month we got SO MUCH more!  I mean seriously....I am in love with this simple home.

There were quite a few rules that had to be implemented with the new home...rules that pertain to outside time, TV time, cleanliness and the like.  The kids very rarely were allowed to play with neighborhood kids and so they spent a lot of time inside playing with one another.  This neighborhood seems to lack the animal torturing, property damaging youth that our last one had and so outside play is more encouraged here.  There are also more chores that need to be done with the space and that has been quite the adjustment.

I am working on a chart that was suggested to me by a friend....that will be coming soon!!!!

The finished basement has allowed us to give our oldest son some much needed privacy that he had been requesting for quite some time.  He got his own room!  It has been an experience decorating and arranging it to his liking!!  It is far from finished as the child was lacking in possessions!  He moved in with a bed!  The dresser he used was a shared cubby system with his brothers...so he needed a dresser, an entertainment center, a shelf...wall hangings...you get it...he was starting over!

We lucked out and found the cutest entertainment center for $7 at Walmart on clearance!  He hasn't decided what kind of shelving he wants and the dude needs a chair to sit in!  His bed is a loft bed...so sitting on the bed to read or chat with his friends is not an option.

I have a few ideas pinned on Pinterest and will share any projects that are used to wrap up his room!  I am so very excited for him....it's really hard to believe that I have less then 6 years left with the boy.

~Brandie

Monday, March 24, 2014

How I Explain the Easter Bunny!

This year is going to be the toughest to get ready for!  With my sons getting older and the oldest getting to the age of not caring about Holiday fun and trinkets, I found myself at a bit of a lose.  My daughter, thankfully, still believes in the magic and connects to God with the holidays.  Don't get me wrong, my boys understand the meaning of Easter quite well....I am talking more specifically about how the Easter Bunny relates to God, Jesus and the stories.  Growing up, one of the things I found the hardest to wrap my head around was how the Easter Bunny, Santa Clause and the rest of the fairytale creatures we use to create mystery in the lives of children connected to the holidays we were celebrating.  As my children grew themselves, I created ways to connect these things so that they made sense.  Santa Clause was one of the three wise men who loved the feeling of giving to Jesus on his day of birth so much that he set out to do it every year for all the children.  This is his way of celebrating that great day.  We remember the gift of the wise men to baby Jesus when we gift to one another.  The Easter Bunny was and still is a hard one to sell.  Santa as a Wise man was so easy to thread together....

Here's my Easter Bunny story....on the day that Jesus died a bunny was present and saw the whole thing.  He followed Jesus to his grave, and saddened by the events he witness stood near the tomb for the days that followed.  When God brought Jesus back to life, the bunny was there and some of his magic and power touched that little bunny.  To celebrate the return of Jesus the little bunny set out to celebrate.  It started with sharing the news with all of his animal friends, mainly chickens!  To show the humans how grateful they were for Jesus's resurrection, the animals left treats and...well...eggs...at the doors of the humans they knew.

(Look I know I am reaching here....but when you want a holiday to make sense to children who ask a LOT of questions...this is what you end up with)

As time passed the Bunny continued to live, from that Godly power that splashed over him.  Every year on the anniversary of Jesus's Resurrection, he would set out to deliver treats and goodies to all who believed.  He realized over the years that he could slow down time....just like Santa...so he could reach all the Christian children of the world.

I found it my duty to ensure my children didn't get bogged down with the commercial views of holidays.  Telling stories like this one allow us to celebrate with all the fun and still remember and understand why we are celebrating in the first place!

What stories do you tell your children??

Thursday, February 6, 2014

A Black Heart Valentine's Collection Box

Yesterday, we had our 2nd snow day in a row.  So I decided we were going to get some things accomplished.  One of those things was the younger kids' valentine collection boxes.  This is my daughter's first year getting to make one and pass out valentine's so I assumed she would go all super girl on me.

I bought the boys heart shaped boxes last year and painted them to appear like Minecraft Hearts (there is a link at the end of this post to find those).

So, I bought the princess and sweet little girl that calls me Mommy a heart shaped box I found at Hobby Lobby, because I knew how much she wanted one last year.  I pulled it out and said "What colors do you want to paint your heart box?" fully expecting to hear pink or purple.  Nope.  This girl shouts with a massive grin BLACK!  I tried to talk her out of it.  No luck.  I did get her convinced that the hearts there were molded into the sides of the box can be red and pink.

And you can bet your butt I did all I could do to make this dark and evil looking heart look awesome...I sprayed that thing with gold glitter!

She is happy with it and really at the end of the day, that is what matters.  Children are really good at throwing us for a loop and stopping us right where we stand.  My daughter is a bit of an expert in that.


Check out the other Valetine's Projects we've completed so far:

Bubble Stick Valentines -->  HERE!
Star Legos Valentines -->  HERE!
Minecraft Heart Collection Valentine Box -->  HERE!
Have a Ball Valentines -->  HERE!

Tuesday, February 4, 2014

Star Wars Lego Glow Stick Valentines!

My oldest son was easy when it came to Valentine's Day.  I could make whatever I wanted, he would pass them out, didn't care what people thought, he gets candy, I get to craft...win/win!

Son #2....yea, not so much!  He's my show off.  Everything has to be "cool" and not "girly" and blah blah blah!

Coming up with a Valentine was difficult, but buddy, Pinterest was here for the rescue!!

I found a blogger who has a son that loves Star Wars Legos as much as Son #2 and she has saved my rear!!

HERE is the link to the printables!  She made them with a white background and colored background.  Whatever tickles your fancy...I chose the white background.

I am OUT of white cardstock and since I just bought a ridiculous amount of colored cardstock, I decided to not tip the boat of insane Micheal's shopping and give the fiance a heart attack.  I printed on regular printer paper.

Then I took a sheet of 8.5 x 11 in red cardstock and cut each sheet into fours.  I then ran the printables, cut out of course, through my sticker machine.

Once that was done, I placed my new stickers on the red card stock sheets.

Next, I cut a slit, well technically three slits on the lightsaber area of the picture.

I slide my glow stick downward (so from the front to the back) through the slits I cut.

To hold the glow stick in place, keeping it's "cool" factor alive, I placed a piece of tape on the back.

Son #2 is raving about these and very excited to pass them out!

Check out my other Valentine's Posts:

Bouncy Ball Valentines--> HERE
Bubble Stick Valentines -->HERE
Minecraft Heart Collection Boxes --> HERE

And watch for more posts this week.  I still have one more kiddo looking for a Valentine and three boxes to make....not to mention the Mantel (that's coming tomorrow!).

~Happy Crafting!!
Brandie

Bubble Valentine's

This year is my daughter's first year to pass out Valentine's.  I was so over the fold in half cards years ago! (Her oldest brother turns 12 this year).

She got to pick out an item to pass out and I made matching tags.

She chose Bubble sticks we found at Micheal's Craft Store.

I printed off a full sheet of of the phrase "You 'blow' me away, Valentine!" on colored card stock.

I cut them out with my straight cutter and ran them through the sticker maker.  I found some patterned scrapbook paper, and cut each sheet into fours.

I determined the layout I wanted and then cut two slits on the left hand side of the paper.  I slide a piece of ribbon through these slits and tied the bubble stick on the paper.

I then placed the sticker onto the right hand side of the paper.  I will have the daughter sign her pretty John Hancock to it and then they will be ready for her Valentine's party!

Watch for two more Valentine's that we will doing this year and also check out the Valentine's we did last year, here!

Sunday, February 2, 2014

PYP Project: Hair bows and Head Bands!

Anyone who knows me well, knows I can get enough of Pick Your Plum!  Today the daughter and I sat down with some bows and head bands I bought a while back.

This is a fun way for us to spend time together among our super busy lives!

We were able to make a TON of bows and quite a few headbands!  The daughter was so excited about them <3 p="">


You can find daily deals for PYP in the top left hand corner of my webpage just under neath the page links.  They change every day and are available for 36 hours or so...or until they are sold out!  I am an affiliate, so if you click my link, I get a little kick back!  It's a fun and easy way to support the blog!

~Happy PYP Crafting!
Brandie

Friday, January 31, 2014

Puff ball cupcakes toppers

I used these at my friend's baby shower and loved them so much I am doing them again for my daughter'a birthday party.

These are the simplest project I've done to date.

You take a toothpick and poke it through a glitter Pom Pom ball....and you're done!!

You can get a pack of single colored pom poms at Hobby Lobby or Micheals for $1.99 and toothpicks wherever you choose to buy those.

~Happy Crafting 
Brandie 

Pin the Cutie mark on the Pony Game!

My crew love pin the "something" games!  They are a huge hit no matter what the age, so far....  My daughter is having a My Little Pony Birthday party tomorrow! 

Here is the Pin the Cutie Mark board game we made yesterday.

It took a little time to get the body and eyes right on Pinkie Pie, but with the help of a projector, I was able to get the job done :).

Once she was penciled onto the foam board, I painted the hair first.


Next I painted her body and added the accent marks in her tail, ear and nose.

I used to outline all my projects by hand, but I found this nifty new tool that makes everything looked polished!  The Sharpie paint pen....I LOVE them!


I used the paint pen to outline Pinkie Pie and draw in the blacks of her eyes.

Do you see where I messed up a bit on her back legs?? Fixed that with white paint :D.  I used two different sizes of round sponge brushes to paint the whites of her eyes and then finished her up by painting in the blues of her eyes.

This is so far....my favorite project!!  


I printed the cutie marks off on the computer and can't wait to see how the kiddos do at getting them on the flank of Pinkie Pie!

~Happy Party Planning!
Brandie